This is Part II in a series on progressing Plyometric exercises efficiently, effectively, and safely with adults and athletes. If you haven’t read Part I yet, please take the time to check it out HERE. To recap the first article, I use plyometrics to help develop lower body power in all populations who are physically prepared to begin a jumping program. Plyos are SPEED-STRENGTH exercises where we want to exert a high level of force into the ground in a minimal amount of time. Improving both maximum force production and the rate of force development (RFD) is essential to increasing power output. Power is a quality that is essential for athletes as most team and individual sports revolve around being explosive BUT improving lower body power in aging adults can give them the ability to stop a potentially harmful fall which means a longer, healthier life. BOTH ATHLETES AND ADULTS can benefit from a well-designed strength program that incorporates plyometrics. In short, plyos are a great tool in our training toolbox to address an essential quality for humans to build and maintain. On to the good stuff now – Phase 4: REACTIVE MULTI-DIRECTIONAL PLYOMETRICS and ADVANCED METHODS TO ADDRESS THE FORCE-VELOCITY CURVE.
If you’ve been following my progressions for plyos throughout the first three phases, we can generalize each as described below:
PHASE 1 - Building the Brakes / Eccentric RFD
- Linear and lateral jumps, hops, and bounds
- Stick the landing of each repetition
- Improve the ability to decelerate body mass rapidly
PHASE 2 - Building the Bounce / Semi-Reactive Plyometrics
- Linear and lateral jumps, hops, and bounds
- Incorporate a sub-maximal “bounce” in between each repetition
- Elicit tendon and connective tissue adaptations to better handle Phase 3
PHASE 3 - Expressing Elasticity / Reactive Plyometrics
- Linear and lateral jumps, hops, and bounds
- Minimize ground contact times between each rep
- Train the ability to store and reuse elastic energy through the stretch-shortening cycle
After incorporating these three initial phases of plyometric exercises for 3-5 weeks EACH, I move trainees into more advanced exercises.
PHASE 4
ADVANCED PLYOMETRICS – REACTIVE MULTI-DIRECTIONAL AND LOADED/ACCELERATED VARIATIONS
**I use these variations with my athletes almost exclusively. These trainees need very specific adaptations that are applicable to their sport. These are not exercise to just jump into for fun or a challenge – they are used to elicit specific, performance enhancing adaptations. Unprepared trainees needlessly risk injury or poor results by attempting the following these plyometric variations**
By the time we get to Phase 4 plyos, trainees should feel explosive and springy. They should also be strong and stable in all three planes of motion. For the most part, the athletes I train are hockey players – and more specifically – hockey goalies so a lot of these variations are based off of their specific needs: lateral and rotational power and elasticity. However, lateral and rotational explosiveness are essential qualities in a lot of sports. Baseball, lacrosse, tennis, basketball, and plenty of other athletes could potentially benefit from some of these exercises.
I like to use the Reactive Diagonal Bound to first introduce multi-directional plyometrics:
This variation starts to introduce different force production strategies and challenges foot/ankle stability in a new way. Progressing it even further, we can use the unilateral variation:
One of the most advanced unilateral plyometric variations I use, the Reactive Diagonal Hop challenges medial and lateral ankle stability under high force and high velocity. Hockey goalies’ ankles take a beating with the contemporary style of stopping pucks so building some resilience off-ice can be paramount in preparation for a long, grueling season.
Another way to challenge the foot and ankle in a variety of directions is the Reactive Square Hop:
Examples of other multi-directional plyometrics I use are seen below. The Reactive V-Bound forces the trainee to change direction multiple times in different directions and use high levels of coordination and core strength to control their body mass throughout the entire set. Using our hockey goalies as an example again, this variation can help to improve quick adjustments on passing plays or pivoting to drive back to the post on a bang/bang play. Remember to keep the reps low and the intensity high to create maximal changes in POWER.
The Reactive U-Bound is a very rotational plyometrics where the trainee must create rapid 90 degree turns off of the ground and continue them in the air, all the while controlling their mass:
It might not exactly resemble their sport, but athletes of many sports encounter these forces multiple times on a daily basis in practice or competition. It’s important to understand this and if the trainee plays a jumping based sport (basketball, volleyball, etc.), jump training should be extremely limited IN-SEASON. The OFF-SEASON is a great time to implement these high intensity methods. In a normal off-season for my hockey players, Phase 4 is the last month before they report to camp. Once athletes are in-season, strength training takes a back seat to sport training, practice, and games. Reverting back to less complex plyos, or eliminating them completely (depending on the sport), is important in keeping athletes fresh and healthy for competition.
Addressing the Force-Velocity Curve
All of my training programs begin with an Initial Consultation and Movement Assessment. For my off-season athletes, I will also run a full Performance Testing Battery to get a baseline of where they are it in terms of their relative strength, power, and speed. Last hockey off-season, I had every single one of my athletes improve their scores in every test – that’s outrageous! A lot of it is due to the individualization of their programs. I take tremendous pride in designing individualized programs for each person who trains with me, and the results show it.
If we are speaking in terms of what advanced plyometric variations to use with an athlete, I look no further than their vertical jump tests. I’ll test two different variations during the Testing Battery: Countermovement Vertical Jump (CVJ) and Static Vertical Jump (SVJ).
Countermovement Vertical Jump:
Instruct the athlete to jump as high as they can, using an arm swing and any degree of recoil (any dip and drive of the knees, hips, and trunk) to preload their musulature. If you asked somebody to jump as high as they can, they would naturally perform a countermovement jump. The CVJ allows the athlete to take advantage of the stretch-shortening cycle (discussed in Part I) and will always be higher than the SVJ. This test is an expression of the athlete’s ELASTICITY or REACTIVE STRENGTH.
NOTE: I have not yet tested multiple jumps, but there is some research to support testing reactive strength with a multiple jump test. This is probably something I need to consider using in the future.
Static Vertical Jump:
The athlete must pause at the bottom of their preload or “dip” before the vertical jump for a given amount of time. The pause dissipates stored kinetic energy of the stretched musculature, lessening or nullifying the stretch reflex. SVJs will be lower than the athlete’s CMJ for this reason.
Both of these measures become an important part in programming for each specific athlete and it has to do with the FORCE-VELOCITY CURVE.
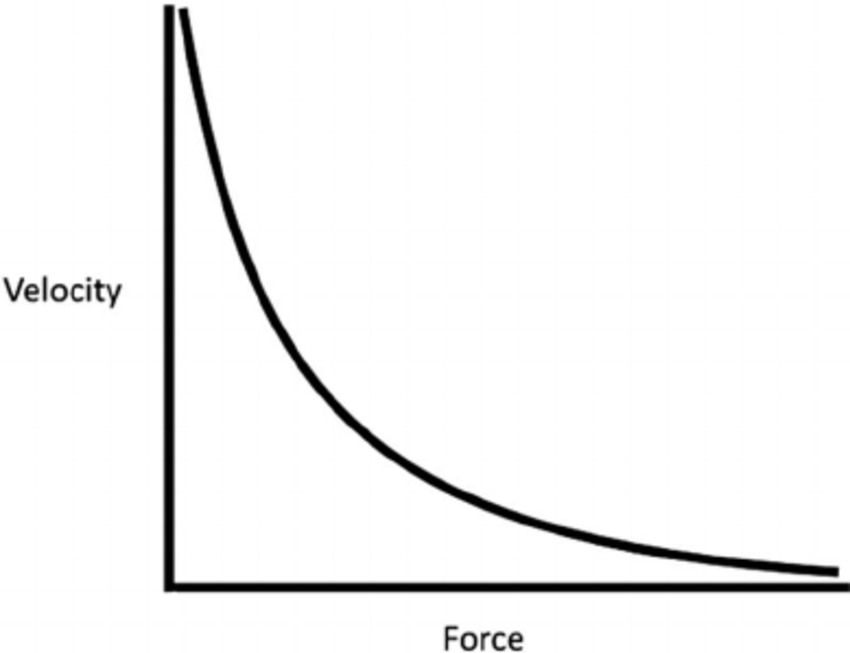
As you can see in the above image, FORCE or maximal strength is inversely proportional to VELOCITY or speed. That means that the slower a movement is, the more time there is for force to be applied and thus, higher total force output – think maximal effort lifting. Conversely, the faster a movement is, the less time there is for force to be applied, leading to greater acceleration and higher velocity.
Still with me? Depending on the height of each vertical jump test, and the discrepancy between the two, I decide what quality an athlete is most in need of in training and can garner a specific result. I can categorize the athlete according to the numbers:
Low Jumps, Low SVJ:CVJ Discrepancy
If an athlete has lower than average jump numbers compared to their peers, they are most likely undertrained, overweight, or both. They cannot accelerate their mass fast enough to produce a high/average jump height. Having a low SVJ:CVJ discrepancy means that the athlete is lacking some degree of elasticity; in this case, we know the individual is undertrained/weak so I would not use any advanced methods of plyometrics. The focus would be on building eccentric strength through traditional means (overload, tempos) while mastering the first 3 phases of my plyometric progression, ESPECIALLY REACTIVE VARIATIONS due to the lack of elasticity or reactive strength.
Low Jumps, High SVJ:CVJ Discrepancy
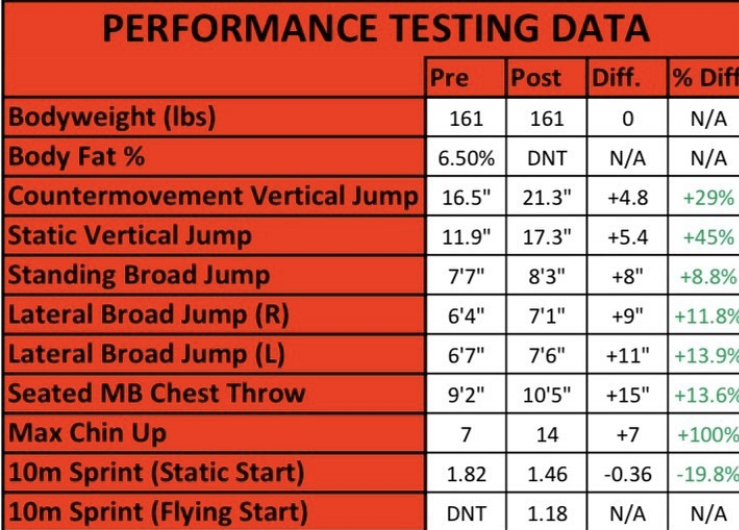
If an athlete has low jump numbers AND a high SVJ:CVJ discrepancy, they probably have very low force production potential. I tend to see this in untrained youth who are lean and light, but weak and untrained. Traditional, well-designed strength and power training will typically have these numbers jump up to average and beyond quickly and the discrepancy between countermovement and static jumps will normalize. I had a Junior A hockey player who was this type in the summer of 2020. After 3 months, here were the changes in his jumps:
Notice the percentage change in his CVJ and SVJ. Both improved significantly, but the SVJ at a higher rate. In terms of this jump profile, get them stronger and it almost takes care of itself.
High/Average Jumps, Low SVJ:CVJ Discrepancy
Once an athlete presents with “good” jump scores, the SVJ:CVJ discrepancy is a key piece in programming plyometrics. With this profile, the countermovement and static vertical jumps are clustered together – we can note that FORCE PRODUCTION is high (jumps are average or high relatively) but that even with a countermovement, the athlete cannot utilize the stretch-shortening cycle as efficiently as others. They need to work on their RATE OF FORCE DEVELOPMENT (RFD) in order to apply their force more rapidly. One way to force faster muscle contraction rates is ACCELERATED PLYOMETRICS. Here are some variations focused on a single, max speed contraction:
Once the athlete understands how to perform the exercise well, we can link them together in continuous fashion – this will build ELASTICITY, tendon stiffness, and reactive strength which will show up as an improved CVJ.
You can see that in the Hurdle Jump w/ Bounce, I absorb the landings smoothly and redirect my mass back into the air before attacking the ground and jumping over the next hurdle. With this type of plyo, trainees will learn to leverage tendon stiffness and harness the power of the stretch-shortening cycle (SSC).
High/Average Jumps, High SVJ:CVJ Discrepancy
When an athlete can jump on par or higher than peers, but has a larger than normal SVJ:CVJ gap, we know their FORCE PRODUCTION potential is high (like the above athlete). Though the force is being applied rapidly (as shown by a high CVJ), we can force (pun intended) the athlete to produce MORE FORCE in the same amount of time by using LOADED PLYOMETRICS.
Loaded plyos add excess load to the trainee and thus elicit speed-strength adaptations. The KEY PIECE in utilizing this method effectively is to only use 10-20% of a trainees 1RM load on the exercises. The biggest problem I see with people attempting to use loaded plyos is that they add far too much load and, in turn, the movement is not a plyometric anymore – it becomes some weird looking, bad attempt at a light squat. When the load is too heavy, the RFD is too low and then trainee is training too slow to actually improve their explosive power. Here are some loaded plyometric variations utilizing both a reset and continuous rep scheme.
You’ll notice that the loads I choose for these exercises for myself are 20% of my 1RM for each of the exercises. When performing loaded jumps, we must make sure that form is on point – another reason why using appropriate load is imperative. After using these variations, the athletes SVJ should work its way up as an acceptable portion of the CVJ.
There you have it, 14 more videos of advanced plyometrics to add to your training arsenal for Phase 4 of the DHP plyo progression and beyond. I hope you’ve learned something from this two part series on plyometrics. Remember, this is by no means and exhaustive list of exercises I use, nor is it a list of “the best” plyometric variations out there, but rather a window into my progression and decision making process when coaching adults and athletes alike. Let me know your thoughts or questions in the comments. I have to run back to the gym to coach people to get better:
Get Strong, Stay Strong.
Coach Dex
