
Plyometrics (Plyos) are a powerful method of training programmed by coaches and trainers and used by athletes and adults to develop POWER or the RATE OF FORCE DEVELOPMENT. Besides being an essential quality for improved sports performance, the general public – especially aging adults – can benefit greatly from an increase in lower body power. Plyometric exercises and methods may be common place around the globe as a part of an exercise program, yet they are often misunderstood and are not implemented very effectively in many cases. Plyos must be progressed and regressed appropriately in order to elicit the intended adaptations of the trainee; this two part article will show my thought process behind using plyometric exercises safely and effectively with both athletes and general population trainees.
OVERVIEW
As mentioned above, plyometric exercises seek to increase one’s rate of force development (RFD) or power. Simply put, RFD is the ability to rapidly apply force to an object or the ground. This quality is dependent on two variables:
- How much FORCE can be generated
- Total force is a function of maximal strength. This is one of the main reasons why all of my training programs revolve around increasing strength (read more about this concept HERE)
- How RAPIDLY can that force be applied
- Being able to apply high force over a short period of time will accelerate an object or body faster than if the same amount of force was applied over a longer duration. This is a function of inter- and intra-muscular coordination, muscle firing rates, rate coding, and the utilization of the stretch-shortening cycle
If we know POWER = force x velocity, increasing the ability to produce force (1) AND heightening the velocity at which the object/body moves by applying that force quickly (2) will exponentially improve power output.
“Being a more POWERFUL athlete means faster accelerations, quicker change of direction, and more explosive athletic potential. Being a more powerful adult means less potential for harmful falls by being able to react to and catch your body weight in a stumble or unstable situation.”
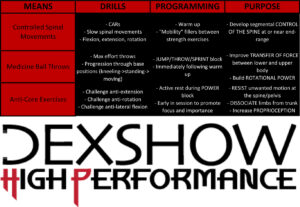
Power exercises really come down to 2 different types:
Speed-Strength Exercises
- Light or no load
- Explosive intent
- Near maximal velocity, lower force
- Plyometrics
- Medicine Ball Throws
- Sub-maximal Olympic lift variations performed for speed
Strength-Speed Exercises
- Light – moderate load
- Explosive intent
- Higher force, less velocity
- Near-maximal Olympic lift variations
- Dynamic Effort Method (Sub-maximal loads for speed)
Plyometric variations are Speed-Strength Exercises and can be performed for the upper or lower body. Upper body plyometrics usually come in the form of some type of medicine ball throw or other ballistic upper body movement. Lower body plyometrics are a form of jump training. From there, plyos can be split into two main categories: EXTENSIVE PLYOMETRICS or INTENSIVE PLYOMETRICS. Extensive plyos are sub-maximal effort and usually performed for higher reps, as part of a warm-up, or as a conditioning modality. This type of training increases speed and power endurance of the lower leg, foot, and ankle. Jumping rope for time, high rep box jumps, and pogo jumps are examples of extensive work. Intensive plyos are done with maximal intensity (and in turn, lower total volume or reps) with the intention of generating the most height and/or distance possible through a high level of RFD. These variations can also take advantage of the stretch-shortening cycle. This article deals primarily with INTENSIVE, LOWER BODY PLYOMETRICS. I program plyometrics as multiple sets of 1-6 reps done with maximal effort – the intent is to drive positive power adaptations, improve dynamic hip, knee, and ankle stability, and increase tendon tissue quality and tolerance.
Before we get into some exercise variations and progressions, I’ll review the nomenclature I use for my lower body plyometric exercises.
JUMP – bilateral (2 leg) take off, bilateral landing
HOP – unilateral (1 leg) take off, unilateral landing on the same leg
BOUND – unilateral take off, unilateral landing on the opposite leg
With that sorted out, let’s get into the good stuff.
Phase 1 Plyometrics
LANDING AND FORCE ABSORBTION (ECCENTRIC RFD) – BUILDING THE BRAKES
Lambourghini’s have enormous brakes. Sure, they also have excessive horsepower and torque, but what good is that if you can’t control that power? The first step in implementing plyometrics into any training program is to build the brakes. How well can you control your body mass with gravity acting on it? Landing and body control is the first essential piece in gaining maximum benefit from plyo work. This begins with sticking the landing soft, in every jump performed. Think of trying to land in a puddle without making a splash or being a ninja sneaking up on somebody. Absorb momentum and stop yourself. Landing is the ability to produce force quickly to rapidly slow and stop your body mass – it is a display of POWER. Assuming the trainee has built sufficient strength and can tolerate some impact, we begin introducing plyometrics by jumping and landing – smooth, soft, and under control. In fact, when I’m coaching plyometric jumps, no matter what phase of training we are in or who is training, we stick the landing on the last rep even during more advanced drills.
An exercise that is a great introduction to LINEAR PLYOMETRICS is the Box Jump:
By raising the landing platform, the forces needed to decelerate our body mass upon landing are decreased. Thus, this is a good place to start for older adults, weaker or heavier athletes, or youth. The box height can vary but we must understand that if we are exclusively discussing landing forces, the higher the box, the lower the demand. People often perform box jumps at a height that is much too high, impairing their landing mechanics and reinforcing poor muscular coordination and deceleration. In a sense, if you perform jumps at the same height vertically, we can increase landing demands by lowering the box, or decrease them by using a higher box.
By removing the box and adding a hurdle, we expose the trainee to the full force of gravity acting upon their body mass during landing. Here is the Hurdle Jump – Stick:
Use a hurdle height where the landing can be crisp. The hurdles are too high if the trainee cannot stick the rep on each landing. The stick is the most important part of all of my Phase 1 plyometric progressions.
For my athletes, I usually program unilateral versions of these exercises at the start of their off-season. Most team sports are played primarily on one leg at a time as sprinting, skating, cutting, pivoting, and other athletic movements are all single leg based. The better any athlete is at decelerating their mass (increasing unilateral strength and power), the faster they will be able to change direction and adapt to the demands of their sport. Here are the unilateral versions of the above exercises:
The concepts for these two variations remain the same, but the unilateral demand is much higher. I typically will program single leg plyos to athletes only and keep my general population adults doing bilateral plyometrics – the reason for this is that the potential risk:benefit ratio for achilles tendon/calf injuries to adults is much higher than athletes and my NUMBER ONE RULE FOR TRAINING IS TO NOT GET INJURED WHILE TRAINING.
If we’re talking about injury risk during training, let’s consider plyometrics. While the acute injury risk of bilateral plyometrics (when using an appropriately scaled exercise and reasonable set and rep scheme) is fairly low, the potential to induce chronic pain can be high. I’ve seen and heard horror stories of the 200 rep box jump “work out” that leaves you with patella tendonitis for 6 months, the 500 double-under set that gave you a “tight lower back,” or the “sport-specific” dryland that gives 12 year old, untrained kids shin splints for 6 weeks. Sound familiar? If you do not have any education or experience in prescribing exercise programs for people, you shouldn’t be doing it.
Pain is NOT the cost of training.
Training should help alleviate pain, not cause it. Nobody makes sustainable gains training in or through pain. With that said, if you feel pain (pain is not muscle soreness but you can read my thoughts on excessive muscle soreness HERE) after a plyometric session, you need to regress the exercise or perform less volume. Period.
Moving on. If someone is training more than one time per week, I will introduce LATERAL PLYOMETRICS in Phase 1 in addition to the linear variations. Lateral plyos occur in the Frontal Plane and can further challenge hip and knee stability as well as improve lateral power that is essential in most sports. Here are 3 lateral plyo variations that I use in Phase 1:
When performing the Lateral Hurdle Hops, ensure that both legs are exposed to hopping and landing in both the medial (towards the centre of the body) and lateral (away from the centre of the body) directions.
Phase 1 of plyometric exercises is all about building the brakes. Stick with these variations for 3-5 weeks to let your body adapt to the potent stimulus and to further prepare your body for what is to come in subsequent training phases. If you need to progress the exercises during the training phase, simply raise the hurdle height but REMEMBER, the landings need to be dialed in to garner the benefits.
Phase 2 Plyometrics
SEMI-REACTIVE PLYOMETRICS – BUILDING THE BOUNCE
In Dexshow High Performance programs, the second phase of plyometrics is what I call “Semi-Reactive” and these types of exercises heighten demands on the lower body through added velocity and increased ground reaction forces. Jumps, hops, and bounds in Phase 2 include a “bounce” phase upon landing before exploding into the next rep. Here is what I mean:
You can see that in the Hurdle Jump w/ Bounce, I absorb the landings smoothly and redirect my mass back into the air before attacking the ground and jumping over the next hurdle. With this type of plyo, trainees will learn to leverage tendon stiffness and harness the power of the stretch-shortening cycle (SSC).
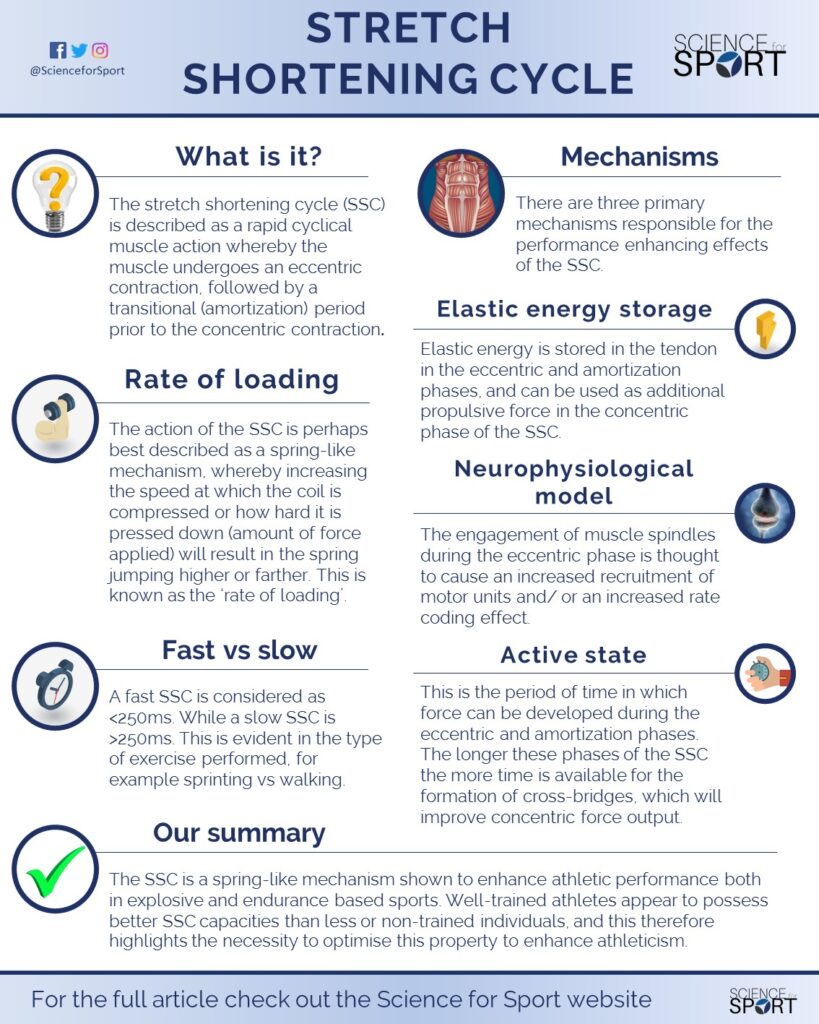
The SSC is a complex, dynamic phenomenon that occurs in the muscle-tendon unit. The infographic above is pulled from a great article explaining the stretch-shortening cycle. If you’re interested in learning more about it, the article is linked HERE.
Phase 2 plyo variations begin to introduce shorter ground contact times and help athletes to develop some elasticity – a quality necessary for improved sports performance and to further prepare their tissues for the higher demand plyometrics coming in Phase 3. Unilateral semi-reactive plyos really start to challenge the foot/ankle complex to maintain stiffness and help propel the athlete into the next rep by utilizing the SSC.
Here are some examples of semi-reactive lateral plyometrics:
With these jumps, make sure to keep your foot width a similar distance throughout the set of jumps. Below are some unilateral variations:
An important piece of semi-reactive plyos that I like to cue is that we want the bounce to be in the same footstep – this forces the trainee to absorb force and redirect it vertically before displacing they body mass again on the next rep. How we interact with the ground is always an enormous part of sport and everyday life. You’ll notice that even in these variations, I stick the last rep of each set – we always want to build and maintenance the brakes! After spending another 3-5 weeks performing semi-reactive plyometrics, I will progress my trainees to the next phase.
Phase 3
REACTIVE PLYOMETRICS – EXPRESSING ELASTICITY
This phase of plyos is focused on limiting ground contact time and fully utilizing the stretch-shortening cycle. After the first rep, we want to attack the ground for a quick, sharp ground contact which, in essence, loads the spring for the subsequent jumps, hops, or bounds. As usual, stick the last rep of every set. Here are the reactive versions of the Hurdle Jump and Lateral Hurdle Jump:
Unilateral reactive plyometrics are very taxing, both on the central nervous system and the local tissues and structure. For this reason, I only use reactive single leg plyos with athletes and not general population adults. Risk of calf, achilles tendon, and/or ankle injuries are the primary driver of my decisions here and adults tend to be less physically prepared for these exercises. Below are the baseline unilateral plyos I program in Phase 3:
In all of these variations, the intent is to spend as little time on the ground as possible and to be springy. The “reactive” portion of these plyos is how well our foot/ankle complex reacts to the ground contacts at high speeds. If we don’t have enough REACTIVE STRENGTH, the ground contacts will be too long, look slow and sluggish, momentum and stored energy will be lost, and the benefits of the exercise diminished. The hurdle height should be at a level that you can get over each hurdle every rep with minimal time on the ground and also be able to stick the landing on the final rep. After 3-5 weeks of training reactive plyometrics, I will introduce more advanced jump training modalities like MULTI-DIRECTIONAL PLYOS, LOADED PLYOS, AND ACCELERATED PLYOS. The variations shown in this article are designed to progressively expose the trainee to higher levels of stress of which they will adapt to. Skipping phases without earning the progression can lead to pain, both chronic and acute, and is not the purpose of using plyometrics as a training modality.
Stay tuned for Part II of this series which will address advanced plyometrics for Phase 4 and how I implement them. Questions? Leave them in the comments!
Get Strong, Stay Strong.
Coach Dex